Thứ Bảy, 24 tháng 11, 2012

New Quilling Technique Tutorial - Quilled Pine Cones

As promised, here is a new technique quilling tutorial for making quilled pine cones to be used as Christmas decor or Christmas table decor. I have not seen a tutorial for making quilled pine cones so this is probably the only one on the net at this point of time.

Why quill pine cones?? Well, I think real ones are too heavy and bulky to be used for quilled decor . It is also a challenge to quill  nature, and what is Christmas without pine cones!!

Step 1

 Make 32  isosceles triangles using 5.5 to 6', 3mm strips and curve the top as shown above. You can use whatever number is appropriate for the size you are aiming at.


Step 2
 Tear 6, 1/2 inch 3mm strips,
 8, 3/4'  3mm strips
8,  1'  3mm strips
6,  1 1/4'  3mm strips
and 4,   1 1/2 ' 3mm strips
You may vary the lengths to suite your requirement.

Step 3
 Glue the isosceles triangles to the strips as shown above

Step 4
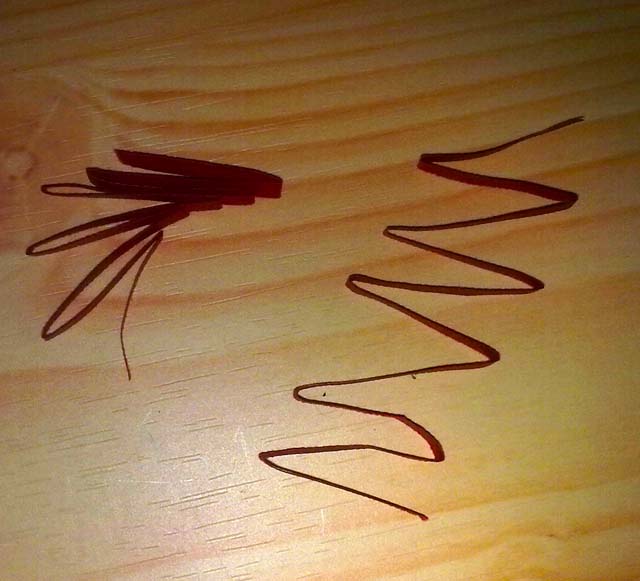
Curl the strips by scoring the nail of your thumb against the side of the strip. Note the direction of the curl

Step 5
 Now paste the petals as shown above so that it curls inwards, to make a flower.  You should make about 5 flowers as per the strips you tore in step 2's instructions.


Step 6
 Place each flower on a semi soft surface ( I used foam) face downs as shown.

Step 7
 Now using the end of a brush, rub in circular motion so that it curls up and outwards as shown, leaving a small center.

Step 8
 Repeat for all flowers which should look like the above once completed. Note that the whole triangle is visible from the outside.

Step 9
Now apply glue to an 8 petalled flower as shown and glue it inside a 6 petalled flower which has the shortest petals. Note that the flowers should be glued in the order of increasing petal lengths, so that each set of petals peak out over the previous set. When you glue, it should be glued so the petals come out like a cone. You may need only to apply glue to the side of the strips.

Step 10
Make sure it looks like this, with the inner flower's petals peaking from between the outer flower's petals.

Step 11
Continue to glue till you get a nice cone shape as shown above making sure the number of petals reduce for the top layers and your done.

Thứ Năm, 22 tháng 11, 2012

Quilled Pine Cones Quilled Pine Leaves Quilled Bell- Quilled Christmas Decor


 As promised, quilled pine cones, bells and pine leaves, all made from paper strips. I like the way the pine cones turned out, so a tutorial will be my next post as promised.

I made the bell by covering a small bell with cling film and quilling on top of it starting from the top. Made tiny coils and pasted one to the other. Make sure that you glue only the sides of each coil and paste it to the adjacent coils without getting the glue onto the bottom or top of the coils. From time to time press into shape and hold for a while or put a rubber band around so the shape is held tight against the mold while it dries. If you see space between coils apply glue and get them stuck  or add a new coil in between. More uniform coils make better quilled molded shapes.

Allow to dry well before slipping it off the mold.


The leaves are simple. just made use of the Christmas tree fold I did for the poinsettias veins and pasted each to another strip to make a half leaf, then pasted 4 together to make one 3d pine leaf.

Those who think the pine cones are cool,he tutorial is here. Tutorial for quilling molded bells is  here.

Thanks for visiting / following my blog.

Thứ Sáu, 16 tháng 11, 2012

New Quilling Technique Tutorial - Filigree Christmas Poinsettias


Here goes!! A new quilling technique tutorial on making filigree  flowers, Christmas Poinsettias, using the much loved beehive quilling technique. There is no encircling to spoil the lacey look.

 There  are 5 main steps to making this flower.
  1. Make the veins for the petals. (The petal is really a red leaf in the poinsettia).
  2. Make the beehive quills to paste onto the veins.
  3. Paste the two halves to make the petals.
  4. Assemble the petals and make the flower.
  5. Make the stamen and glue it.

Beehive Quilling with a Difference

For this flower you need to be familiar with beehive quilling since you are going to do the beehive quilling slightly different, so it does not unwind too much.

Christmas Tree Fold

What I call christmas tree fold (green)is slightly different from the fan fold (red) which are both done by folding the strip up, then down then up again and so on till you reach the end of the strip in zig-zag fashion. In the fan fold, the length of the upward portion and the downward portion, that is both sides of the V are equal. In the chrismas tree fold, one side of the V is folded longer so the fan is elongated downwards.
 Take a strip and fold upwards at 1cm then fold downwards at 1.3cm then up again at 1cm and downwards at 1.3cm and continue to the end. You should end up with something that looks like the green one.

 Making the Veins


  1. Take 2, dark red  strips ( length depends on how big you want the petal) and make a christmas tree folds using the whole strip.(pic 1)
  2. Shape it to look like pic 2 to form the veins of one side of the petal and glue the 2 sides  of each V together to form veins.
  3. Since one  side of the v is  a little longer than the other, this difference will form the vertical distance between 2 horizontal veins. (Pic 3)
  4. Now fold the unglued portions so thay stand vertical to the veins (which run horizontal) as shown in pic 3 and shape it like a leaf as in pic 4.
(Please note that I have not pasted all the veins in pic 3  in order to highlight the glued part and the christmas tree like fold.)


Making the Beehive Quills - Variation

 You are going to quill the beehive with a slight variation to make it more stable  as shown in the pic above. You can see the difference in the pic. Please note that the pics below show regular beehive as I discovered the variation when I was making the second petal.
 

In a normal beehive you ( See tutorial) you quill the sub-coils, clockwise. Here, you alternate clockwise turns and anti-clockwise turns for consecutive coils,  ( that is quill one coil using clockwise turns and the next coil using anti-clockwise turns and so on) so that you get the above paired sub-coils which are more stable.
  1. You will make the leaf bottom up by gluing coil sets on both sides of the vein.
  2. Make a 3 sub-coils set for the outside of the bottom vein (see pic 1) and several 4 sub-coils sets for the mid veins and again 3 and 2 for the tapering, top portion.
  3. Glue the starting and ending sub-coils shut, after quilling the beehive variation and letting it unwinds a bit.
  4. Glue the 3 sub-coil set, as shown in the pic below, to the bottom and a 4 sub-coil set to the inside of the bottom most vein. (Note that your veins would have been stuck together unlike this pic). 
  5. Then glue the next vein to the top of the 2nd set of sub-coils, that is the one with the 4 sub-coils.
  6. Then glue another set of sub-coils  on the vein and keep alternately gluing till you reach the top of the petal, where you would have glued shorter sub-coil sets with 3 and 2 sub-coils to achieve the taper . If your veins are longer cut them off.
Once done, your half petal should look like the pic below. For those who are confused by the instructions, just try to get the shape below by gluing sub-coil sets of beehive quills to the veins. This method only requires you to make veins and shape it like a tapering leaf and then fleshing it out by gluing beehive coils between the veins.

Now paste a strip to form the vertical center vein and loop it and glue to form the petal tip at the top.
Complete another half petal, (  you will not need a center vein for this) and paste the two halves together. Shape the petal and pinch the sub- coils at the edge of the petal  if you want a sharper, lobed look. 

Viola! you got your lacey petal.
 

Assembling the Petals

Make 5 or 6 petals.
You will now arrange the petals as shown in the pic above. Half the petal should be on top of the adjoining petal on one side while the other half should be below the adjoining petal on the other side. Glue them fast. You may have a bit of space in the center if you wish.

 Making the Stamens


  1. Take 5,  1inch  5 mm strips of yellow and 1 inch dark red 3mm strips. Cut the yellow as shown above to form fringed petals and glue them together red to yellow.
  2. Starting with the red, make 5  tiny fringed flowers and open them out slightly to form the flower like stamens.
  3.  Now glue each flower at the center, just where one petal goes below the other.

 
Phew!! That's it folks!! I hope I did not flummox you too much!!

 For more christmas decor check out my pine cones tutorials.

Thứ Tư, 14 tháng 11, 2012

Christmas- Quilling-Felligree-Flower-Christmas Poinsettia


Quilled Christmas decorations and quilled table decor adds to the levity of Christmas, so in the spirit of the occassion, I thought I must post a tutorial with something unique and these are the results of my efforts. Filigree petaled Christmas poinsettias. I think they look rather nice.

I have used beehive technique, which I have fallen in love with and for which I never fail to mentally thank Susan of susanquilling.

I was a bit bored with the beehive being encircled , like the leaf above, all the time. I thought this did not allow the delicate lace like look to be enhanced, so I was determined to devise a method to retain the filigree outline and by gad, I did it. Of course it needs a bit of gluing to retain the shape.

Tutorial is posted here.

Thứ Hai, 12 tháng 11, 2012

Quilled-Flower-Frame- Bleeding Heart

This is a  quilled flower frame using 3d quilled flowers and comb-husked leaves. I have chosen bleeding hearts as they were 3 petaled and a challenge to make. I used beehive technique for the petals. To describe how the flowers were constructed would require another  long tutorial, but they look like the real flower with stem and all.

For the red flower centers I used a tear drop punch and there are 4 petals. the flowers are in various stages of maturity just like a real bunch.

Here is a closer look so that you can figure it out how the flower is done.

Thứ Tư, 7 tháng 11, 2012

Graphic- Quilling Quilled-Landscape Quilled-Seaside Quilled-Scenery - Palm Beach

I thought I'd post this quilled seaside landscape picture, for which I used graphic quilling technique and which I did a long while back, today.

The last week has been so dismal, with storms, hurricanes and floods and so many people have lost so much. During such times, one tends to forget the wonders and beauty of nature which acts like balm to the troubled soul.

This piece is dedicated to all those who lost so much, and I hope the tranquil scene will help you remember that  your troubles will pass away and all will be  serene , calm and well once again just like the sea  which can be so destructive one moment, and so tranquil the next. Just keep positive and believe that all will be well.

I have used strips torn to different lengths, and the method used is similar to the tree trunk tutorial. As I keep repeating , use dark and light shades to create depth.

For the cresting waves, I have used beehive technique which is a great favorite of mine. Even though I love this technique, I only use it where I think it is relevant and represents the element I am trying to depict. I generally use it where fluffy or rounded elements look good.

For the palm  leaves, I have used all shades of green and have folded the strip in V shapes and glued it trying to imitate the natural flow of the leaves. Remember gravity will pull the leaves down.

It looks like this when laid flat on the table. I love the way it looks when laid flat as the spaces are not so visible.
Tips for graphic quilling is available here.

Thứ Năm, 1 tháng 11, 2012

New Quilling Technique Tutorial - Stems, Twigs and Trunks


In this tutorial I introduce you to my techniques  and tips on making stems, twigs and tree trunks without using wires or toothpicks. I haven't found any tutorials for these and I thought I would fill in the gap. I am a bit of a stickler, so I like to use only strips when I am quilling.

These are suitable  for use in making cards or flower frames. Some of the pieces I have used this are
Twigs & Flowers, 
Quilled Tree Landscape
Tree & Water
Butterfly Garden
Clematis Trail


Twigs
  You can make twigs that look gnarled or smooth using the same method.


  1. Take 2 brown strips.
  2. Apply glue to the top of one about 1 inch and glue the other strip on top.
  3. Then fold the strips on either side (branches) alternately as shown in pic 3 above. Make sure you fold at the crotch ( area where a trunk splits into two or more ) .
  4. Now glue the folds together and continue to fold and glue till you complete the twig as shown in pic 4. 
  5. Make sure the branches get longer towards the bottom. One strip will form the right branches while the other strip will form the left.
  6. If you want the gnarled look  crimp it unevenly with your hands as shown in pic 6.
  7. If you require the branches to pop up, fold it diagonally at the crotch as in pic 5.
Stems  


  1. Take 2 strips of the same green or different greens.
  2. Glue one to the other slightly misaligned as in pic1.
  3. Now curl the tip around a toothpick to shape, apply glue lightly to the inside of the curl and along the rest of the inner strip and twist it between your thumb and forefinger like you twist a wick as shown in pics 2& 3.
  4. It is easier to twist if you hold the untwisted strips in one hand as shown in pic 4 and hold the twisted part just above with the other hand and turn it.
  5. Make sure the unwound part is not at 90 degrees to the wound bit, it should be at an angle of 135 degrees.( look carefully at pic 4).
  6. If there are unwound, loose bits as shown in pic 5 simply apply glue on top and twist it into shape.
  7. You can apply glue lightly to the stem and allow it to dry if you want it to be stiff.
  8. If you want thicker stems, wrap 2 more strips on the thin stem making sure that you wind with the strips at about 135 degrees.
  9. Always wind a maximum of 2 strips, any more will make the stem look too gnarled for a stem. 
  10. Remember stems should be smooth as they are tender snd do not get gnarled.


 Tree Trunks


This is Graphic quilling, hence will be 2d
  1. Take several shades of brown, yellow and black and  hand crimp/ crush unevenly as shown in pic 1.
  2. Paste the strips, starting from the lightest to the black on one side to form the trunk. ( This is the side where the light is coming from). 
  3. Paste the dark strips to form the other side of the trunk as in pic 2 graduating to the darkest color towards the end.
  4. Now glue shorter light colored pieces shaped like the roots to the light side and dark shades to the other shadowed side as shown in pic3.
  5. Now tear up the rest of the strips to different lengths as shown in pic 4.
  6. Glue the strips, slightly curving from the light side to the shadow side, making sure you use more light shades on the light side and dark shades on the shadow side, but do include light colors on the shadow side as well.
  7. Glue enough pieces to cover the white but allow a bit of space so that the shadow of the strip will give the white paper, color. ( see pic 6).
  8. Look at pencil shaded images to get an idea of how the contours of  lines create  depth, light and shadow and think of the paper strips as pencil lines.
  9. If you need the outline, make it with a stylus and emboss it so that there are no ugly pencil marks.
That's it folks. Hope this helped. If you like my tutorials please leave your comments. It always feels good to know someone is benefiting. 
Related Posts Plugin for WordPress, Blogger...