Hiển thị các bài đăng có nhãn Multi-strip. Hiển thị tất cả bài đăng

Thứ Tư, 9 tháng 1, 2013

New Quilling Technique Tutorial - Butterfly-Wing Leaf

New Quilling Technique Butterfly-Wing Leaf

This quilling tutorial is for a butterfly -wing leaf  I created for the Floral Cascade Flower Frame  which was quilled by using a combination of husking and multi strip technique. However pins and cork board are not required as this is a  free hand husking method. 

The variation in this technique is that loops will alternate between short and long loops to achieve the butterfly –wing appearance. Please try to visualize the process by looking at the pictures before you read the instructions as it can be confusing  for those who do not understand what you have to do. 

METHOD


Take two 3mm strips of the same green and score the side with your thumb-nail to curl the strips and glue them together.


Now make a loop upwards with both strips and hold it between the thumb and forefinger as shown on the left picture above, then pull the inner strip down  to create a shorter loop with your other hand while still holding the loop between thumb and forefinger as shown in the right picture, . (Loosen your grip when you pull with the other hand to allow the inner strip to slide down).


Now glue the strips together at the bottom and loop it around the bottom to the right, a little shorter than the first loop you created (mid loop)  and pull the inner strip to create a shorter one as before.


Glue the strips at the bottom and once again repeat the process to create a shorter  loop to the left as shown above .

Now create two more   loops to the right and the left which is longer than the short loops but shorter than the mid loop as shown above. (This is in order to get the tapering shape of the leaf).  Glue all the loops by using just a tad of glue at the bottom.


If you have strips left use it to encircle the leaf or use a new strip to encircle the leaf. Make sure you get the shape you require and do not tighten  too much. Glue it after encircling the required number of times. Glue the side loops slightly to the encircling strip to make them firm.

Shape the leaf by pinching the top if required. 

Lo and behold , a butterfly wing like leaf that can be used as petals and butterfly wings !!
Happy Quilling

Thứ Hai, 8 tháng 10, 2012

Black & White Quilled Dimensional Flower - Butterfly Heart

I quill 3d flower frames when I want to try out a new flower, so for this quilled floral design, I wanted to try out a layered flower using husking technique  and a simple butterfly using beehive or  honeycomb quilling.

I used a multi-strip heart on which I lay out quilled flowers and leaves.  I made the leaves slightly different from the leaf sprig in the tutorial since I didn't want a leaf sprig with stems. I have also used quilled roses and for the rose leaves I just made folded leaves like the ones I used in A Feathery Discussion.

Thứ Sáu, 28 tháng 9, 2012

New Quilling Technique - Outline Flowers with Multi/ Single Strips

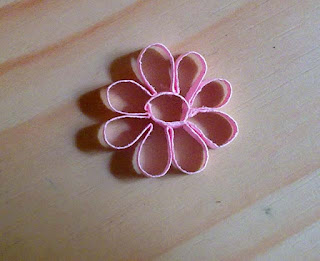
This Quilling tutorial is on quilling outline flowers using scallop strips as per my tutorial with either single or multi strip. These flowers can be used for graphic quilling or to create valentine hearts like my Kiddy Valentine.
This saves the hazzle of quilling each petal separately and pasting. Furthermore, it is very stable once the glue dries and holds the shape well unless you squash it too much.


SINGLE STRIP FLOWER
 Make a scalloped strip as per my tutorial here. first scallop should be long enough to make a circle and glue. The other scallops should be long enough to make petals with.


Now make a circle around a cylindrical object like a pencil and glue it. 


 Apply a tad of glue to the next  fold. Apply to the mountain fold side. ( when you fold paper one side is called the valley side the other side will be the mountain side).
  Paste it to the circle as shown above.The distance is determined by the no of petals you require. If you can achieve outdistance you will get a perfect flower. ( the circle is the most stable geometrical shape in nature as you know).


 Continue the same procedure till you come to the last petal. Cut a bit beyond the fold as shown above and apply glue to the mountain and the underside of the extra bit anf glue it to the circlr and the adjoining petal.


You're done!! shape the circle by inserting a pencil and get the flower into proper shape.


MULTI-STRIP FLOWER

 Prepare a scalloped multi strip as shown above. This flowers is going to be made without a centre.
 Apply glue to the mountain fold side as shown above but apply to both sides and not on the fold itself  as you are going to paste petal to petal'

Glue as shown to create the petal.Continue the process glueing the petals around till you complete the flower. You will need to arrange the petals into a circle and glue as in the flowers below. If required apply a tad of glue to the center to hold all the petals together.

Thứ Bảy, 22 tháng 9, 2012

Quilling Tutorial - Multi / Single Strip Scallops

This tutorial is on how to make scallops with multi strips and single strips. I have used multi strip scallops as edging in my Kiddy Valentine. This is suitable for use as edgings in cards and quilled pictures.

Multi Strip Scallop
METHOD
 Take about 6 to 8 strips and paste them together at one and then curl all the strips by running your thumb nail along the side of the strips or by rolling the strips.


 Measure 1' or whatever length you want the scallop to be, along the curve of the inner most strip and hold all the strips together as shown above between the thumb and forefinger, then gently push the top strips forward with your forefinger. Pull the other strips  one by one with your other hand  to different lengths to curve in between the 1st and last strips.
If you want standard height for the scallop, you can measure the top most strip to a length to more than 1 inch eg. 1.2'  and push the top strip forward with your forefinger to meet the 1' mark of the bottom strip, then pull the other strips one by one to different lengths. ( the difference between the top and bottom lengths will be the height of your scallop).
Glue all the strips at one point. Use a thin  wet brush to apply the glue. Dilute the glue slightly and apply with the very tip of the brush the glue it.
Continue the process to the length you want.
If you want to curve the edging more, remember that the height of the scallop needs to be more to give allowance for the curvature. Try to understand the physics behind what you are doing and it will be easy as pie!!
Use the natural curve you created at the start and do not pull the last strip too taut if you want a curled edging.

If you want to straighten the edging then you can make it with the last strip pulled taut or you can take the curled scallop and fold it to a valley fold at each point where all the strips are pasted .
If instructions look a bit confusing just look at the pics and you can figure it out.


Single Strip Scallop
METHOD

I made these single strip scallops to make the yellow outline flowers in the Kiddy Valentine piece.
Pinch and make sharp folds at equal intervals on a strip of your choosing. All folds should be mountain folds as shown above.
Now take a thin cylindrical object; a thin handled paint brush or toothpick would do.
Now starting at one mountain fold, put the strip on your forefinger as shown, roll the brush handle hard against your finger upto the adjacent mountain fold.
This will curve into a scallop.
Repeat the procedure from each fold to the next fold and you have your scalloped strip.


Thứ Năm, 12 tháng 7, 2012

Floral Lotus Abstract - Quilled 3d Flower Frame

These quilled flowers are made from a combination of multi strip quilling, beehive quilling, fringed flower technique and quilled basic shapes. This design, which uses  3d quilled flowers, incorporates flowers within a flower.
The yellow spray is made from a technique I invented  using a comb. The tutorial is here. It is different from the rice swirl which I used for petals and swirls, but both were made using the comb.
Related Posts Plugin for WordPress, Blogger...