Hiển thị các bài đăng có nhãn quilled flowers. Hiển thị tất cả bài đăng

Chủ Nhật, 8 tháng 6, 2014

Quilled Flower Frame - Daisies & Jezebel Butterfly

This quilled picture of a Jezebel butterfly alight  a daisy was made quite a while back when I was experimenting with quilling 3d flowers plants. I have not used coiling  technique to make the butterfly as I needed to interweave the yellow and red. I adopted my own folding technique here.

Here is a closer look.
I have made the fringed flowers and affixed stems which I made using the method given in my tutorials here. I have wrapped the leaves around the stems to get a realistic look. As you can see the leaves come out of the frame. I got the idea from my graphic quilled piece Sunflower and Swallowtail.

Those of you who like my butterflies can find heaps throughout my blog for which I have used numerous techniques. just type butterfly in the Search object  on the sidebar.

Remember making butterflies is pretty easy. Just use the method I have describe in my How to make a landscape - part 3 Section. Just use whatever basic shape is best suited for the wing sectors. Using an image will enable you to get better shaped wings and more accurate color sectors.

When deciding on the shape and method to use,  think ahead about how you are going to combine colors and get the patterns on the wings. My Tree nymph butterflies are good examples. Take a look at this tree nymph as opposed to this one. As you can see the technique chosen makes a big difference in the outcome.

Tell me what you think of this post.


Thứ Sáu, 11 tháng 10, 2013

Quilled 3D Flower Frame - White Cherry Blossoms and Ceylonese Tree Nymph Butterfly

Well, I had a major issue with my Windows logon and have been shut out of the net for far too long. Had to restore my old version and lost all my software. I hate blogging from the android as typing with one finger is so uncomfortable.

Anyway thing are limping back to normal as all things eventually do.... So here I am back again with a post. Sorry I have not been visiting you guys!! I surely will, as soon as I get things back in order.

I have made the spray by combining the flower on stalks by imitating the inflorescence of the flowers and have used 1mm strips to make peg petals using the method I gave in my Butterfly Flower Frame.

 I have used wire stems and affixed it to the flower as in my tutorial here. The easiest easiest way to make the bunch is to look at the real thing and attach the flowers just like it using a 3mm strip to wind around the stems. Give a coating of glue to keep them firm. The wire gives you flexibility to arrange the flowers as you wish, later on.

I have cut the leaves out of paper and scored lines on it keeping it on a semi soft surface. I folded along the lines to make them stand out. Have a closer look :


For the butterfly, I have combined quilled basic shapes and folded basic shapes.  The body of the butterfly is made with shaped pegs and the wings are spread at a 50 degree angle. I adopt various ingenious methods to keep the wings at an angle. Using the glue gun is one way. I have followed the vein segments as closely as possible to get an authentic look for the wings.

Come tell me what you think.

Thứ Ba, 10 tháng 9, 2013

Quilled Flower Frame - Tree Nymph Butterfly Among Butterfly Flowers

I wanted to try my hand at using shaped pegs for petals so I decided to do this frame for which I have used  one shaped  peg for the lip petal. The rest of the petals are basic tear shaped with spiral centers. The flower is shaped like a butterfly and the stamens are curved above the flower.

here's a closed look:
For the stamens, I have cut a 3mm strip in 4,  lengthwise.

Shaping The Petal
I used 3, 3mm strips of dark and light purples to make the pegs. When rolling I ensured that it was not too tight so that it is easier to shape. First I rolled the coil between thumb and forefinger as detailed in my tutorial on shaping pegs and made a convex shape which I shaped  to a tear drop by pinching on end; It's much easier to shape the peg, after pushing the peg out to a convex .

Once I had the petal shape, I pushed the coils near the pinched end up to convex it while pushing the coils at the rounded end down. (See pics)


lip petal

For the leaves, I made curved, moulded leaves using marquee shapes. You can see the shadow of the curve in the close up below.
The fruit is made by making cup shaped pegs which I have detailed in an earlier tutorial. For more rounded cups, thinner strips should be used.


For the butterfly, I have stuck to basic shapes and the body stripes are created by adhering  strips of the relevant colors.
I have made a curved cone for the stomach and have glues the butterfly so the wings are at about 30 degrees to the horizontal  and not flat on the surface. The butterfly is elevated above the level of the flowers.

The whole arrangement is created by gluing the different elements  at multiple levels in order to get a 3D  effect.

 I generally dislike the side view pics as I dislike the tapering appearance created by this perspective. Hence I do not post this view to show  how the flowers are laid out.

I would love to have your feedback.  I have been remiss in visiting your  blogs  to admire your work  as I have very limited  time on the net at present, but will drop by your blogs as soon as I get a chance. Till then Happy Quilling to you all.

Thứ Tư, 31 tháng 7, 2013

Quilled Flower Frame - A Bouquet of Roses

Its been ages since I quilled something as easy as a rose, so I thought I'd make a bunch  of 3d quilled roses and here it is .... a bouquet of blood red roses with one, white one, to break the monotony.

The paper was a bit smooth and slippery so I crumpled it for an antique look. The roses are on tubular stems and not on wire stems as I wanted it to be thick.

On hind sight, I think I should have gone for the darker green for the leaves, however, I have made  3d leaves and then stuck it to the stem. The leaves are slightly fringed and fan folded.

For the buds, I made a bell shape as in my tutorial in order to make it look like a bud instead of a cone.

I am looking forward to reading all your comments as always.

Thứ Tư, 24 tháng 7, 2013

Graphic Quilled Picture Frame - Sunflower and Swallowtail Butterfly

I have been meaning to blog this graphic quilled picture of a butterfly among sunflowers for a long while but never got down to it till today.

As you can see I have graphic quilled the flowers while the butterfly is made with basic shapes. The leaves are made with fan folded strips. The flower centers are fringed flowers.
 I have used similar techniques for
Bird in a Bower
Tinkerbell
Bambi
Thumper, to name just a few of my graphic quilling projects.

The design was inspired by a free pic available on the net, which I decided to quill. I think  this type of quilling is good for cards too, and would be different from the quilled card that everyone makes.

I would love to have your thoughts on this project.

Thứ Sáu, 5 tháng 7, 2013

Quilled 3D Picture Frame- Swallowtail Butterfly Among Flowers

During my one and a quarter year journey through quilling , I have been quilling butterflies of all shapes, sizes and colors. This  Goliath swallowtail is one of my butterfly frames.  I have just done some grass and flowers  so the frame does not look bare.

The butterfly has been mounted at a higher elevation than the flowers, I have used basic shapes and have followed the vein layout of the butterfly wings as closely as possible on order to get it to look realistic but did not attempt the tiger stripes since I had not figured out how to get the black and white inside a single veined section at that time.

I have made 4 wings and then glued the lower part of the wings on top of the upper wings. Take a closer look


In order to get the body, I have quilled pegs and shaped them like a swallowtails, and then cut black and glued it on the body.

I have quilled butterflies quite successfully before with my butterfly tree  for which I quilled the monarch following the wing sections very closely as you can see in the close up.  For butterfly garden I quilled a stylized butterfly to fit the whimsical look of that frame with no reference to reality!! ... lets call it artistic license !!!

Then for Butterfly  Heart, I only used beehive quilling for the wings and finally for Lilac & Butterflies I graphic quilled the butterflies. So in my long journey with quilling butterflies I have tried all methods. But wait.... I have another method in store for a later post!!

Hope you like this one.

Chủ Nhật, 23 tháng 6, 2013

New Quilling Technique Tutorial - Compound Spike Flower


As promised a tutorial on quilling compound spike type (inflorescence type) flowers which I used for the quilled Black Maned Lion Behind the Picket Fence and  Lilly White. The one here has been quilled densely with more coiling.

Beehive Quilling Tip - simply insert your quilling tool away from the end of the strip and roll either clockwise or anti clockwise, the desired number of times . Make the second coil by inserting the tool an inch or less away from the end of the previous coil and continue as before making several sub-coils using one continuous strip. It will look like the pic below. If you turn the tool clockwise for one coil and anticlockwise for the next, it will look like the second one in the same Pic.
 You can find beehive quilling tips through the search button on the side bar just like you Google stuff.


Method


Take 3 shades of red or a combination of red and orange 3mm strips.  The darker shades should be about twice the length  ( I used 2,  9 "strips and a 5' orange one) of the lightest shade.

Tear the 2 darker shade strips in 2, then glue in the following order :-

 darkest, dark, light, dark and the darkest to make one long strip as in the 2nd Pic.


Now start beehive quilling and start the first coil about .75 inches away from the end of the strip as shown above. Turn clockwise about  5 to 6 clockwise turns and squash it  in the middle as shown above. If you want it to be lace like, make only 3 turns and do not squash.


  Continue to make about 6 more or any number of coils ensuring  you have an odd number of coil. Tear off the excess strip and glue the first and last coils shut. Then arrange  it as shown above.


 Now glue 2 strips together to make a thick stem and tear a 3' piece, then apply glue to one side as shown and glue 3 marquee coils to that side. Now leave one on top and glue the final 3 coils to the other side as shown in the pic. For the lacey flower, you have to glue the coils shut  and shape only the top most coil.


 Once glued it should look like the above..  Now press the 3 coils that are pointing upwards, down and allow to dry. Also glue the top most  coil shut .  If your marque are opening out too much glue them lightly.


Your finished spike flower should look like the above. This may not be that easy for those who have no experience with manipulating beehive quilling but try with newspaper strips till you get the hang of it and then it is a breeze.

If you enjoyed this tutorial please leave your comments to show your appreciation. 


Thứ Bảy, 15 tháng 6, 2013

Quilled Lanscape Picture Flower Frame - Behind The Picket Fence


Today's Landscape Picture is inspired by childhood memories . The picket fence always brings back joyous memories of my childhood home and all those wonderful flowers in full bloom which , beauty was enhanced by the white picket fence.

I have made this in 4 layers and the fence is the bottom most. I have used 3d cones. beehive quilling , quilled roses, fringed flowers and various types of leaves for this project.

The yellow flowers are the same grass flowers I used for Black maned Lion and Lilly White. I love the lacey look of it and they are quite easy to make.

The red flowers are the same as the white veronica  I used in Flower Shower. The white bell flowers are 3d cones and I have glued them directly onto the backing unlike all the other flowers where I made the plant and then glued it onto the backing.

The little pink roses are made from 3mm strips and look very dainty. I have used this extensively in my landscapes like Quilled Tree .

I hope to do a tutorial on the yellow flowers so those of you who have not done so already, click on Join to get Updates or  Get e mails. This blog is for You  to look and learn.


Thứ Bảy, 1 tháng 6, 2013

New Quilling Technique Tutorial - Mold Quilled Petal Lilly

As promised a tutorial on quilling 3D flowers using mold quilled petals. It is not as hard as it looks!!  All the flowers in Filigree Flowers on Trellis and Lilly White were made using this method.

 This method is just an extension of mold quilling which tutorial I have posted  here.

What You Will Need

A plastic or any non stick curved surface such as a spoon, a ball or a cylindrical object placed in a manner that it will not roll away. I use a plastic spoon or the rounded head of my massager!!


Method

Make 20 marquees for each petal using 2 or 2.5" 3mm strips. You will need 100 marquee for each flower with 5 petals.

Now you are going to make the petals on the mold or curved surface as shown above as follows:

R 1   3 marquee                R4  4
R2   4                                R5  3 
R3   5                                R6   1     where R is for row.

Glue each marquee onto the adjacent marquee and do not apply glue to the top or bottom surfaces. Start with 3 for the bottom row and then for the next row, glue the marquee by fitting it into the spaces first like building a wall and then outside making sure you apply glue, only to the portion you are gluing at that time ( i.e the sides of the  bottom half of each marquee) . Continue using the above grid.
Once completed you will get a petal as shown in the pic, molded to the curvature of the surface used as shown below. The steeper the curvature the more time you will have to spend ensuring it is stuck properly.


Make all the petals and allow them to dry well. Meanwhile, cut small circles of 1/2'' diameter. Then make 6 slits to about 2/3 the way to the center. This will give you 5 petals.

Now place the slit circles on rubberized foam or on the underside of your mouse pad ( semi soft surface) and with the rounded end of your quilling tool rub it repeatedly in a clockwise motion till the circle cups in . Then take each petal (you will have 5 if you made 6 slits) and rub the underside of the outer edge of each petal till they curl out like flowers as shown in the pic below. ( the paper curls in towards the surface you are rubbing). Each petal would have opened out if done correctly.
Now if you want your flower to be firm, glue the sides of the petals together up to half way up. Leaving the opened out section unglued gives you the option of shaping the flowers later.

Now glue each molded petal to the paper petals as shown above and allow it to dry. When gluing always allow the glue to become sticky before you bring any two surfaces together.

Once dried well you can shape the flower as desired using the paper center. If desired make stamens and glue it onto the paper center.

Thứ Bảy, 18 tháng 5, 2013

Mould Quilled 3D Flower Frame - Lilly White

A quilled frame of Lillies with mould quilled petals. The leaves are mould quilled too to get curvature. This was gifted to my best friend  who brought me some crafting tools which has made my life so much easier

The white and yellow bunches are beehive quilled and are similar to the flower bunches I used for
Flower Shower, except that they are glued on a single plane onto strips instead of stems.

I have used  marquees for both the flowers and the leaves unlike the beehive quilling I used for the moulded flowers in Flowers on a Trellis.

A simple method to prevent  the marquee from popping out to much is to hold both the pinched ends  and move the top to the left while you move the bottom to the right a few times. That way you can remove the elasticity of the paper and control your moulded shapes more.

Once the petals were done, making the flowers were pretty simple. I shall post a few pics on how the flowers were made in my next post which will be after I return from my holiday. Another tip to standardize the size and shape of the petal when quilling on moulds, is to keep a count of the number of rows you used for the first petal and the number of marquees used for each row. Generally if you increase each row by one marquee it will get wide smoothly and vise versa. 

For the leaves the length of the marquee and the angle at which you glue will determine how wide the leaf is. However you can use the same method as for the petal for leaves too.

I have used 2.5" strips for the petal marquees and 11" strips for the leaf marquees.

Looking forward to reading your comments but please bear with me for taking time to reciprocate as I will be out for about 10 days.

Chủ Nhật, 5 tháng 5, 2013

Quilled 3D Flower Frame - Filigree Flowers on a Trellis

After a long break, quilled 3D flowers in a frame. I have been concentrating more on landscapes all this while, so I thought I'd make a quilled floral wall hanging with  moulded 3D filigree flowers.

 I have tried to achieve the lacey look like  I did for Christmas Poinsettias.  However this is more complicated as I have used petals that are quilled over a curved mould  without encircling it with a strip in order to achieve the lace like quality. The petals are made into curves shapes, just like in the bell  tutorial here.
 In this close up, you can see the petals are curved as they are made on a curved surface. I have used  slightly cupped pegs for the centers.

For this frame too, I have made the plant with stem, stalks and leaves and then mounted it on the backing as in the case of my Orange Blossoms and Sweet William frames. 

I generally mount the plant at different levels (heights ) to get a more intense 3D effect rather than only arrange the leaves and stems over or under the flowers. Though it is not so noticeable in this front perspective shot, if you observe the frame closely, you can see the shadow around some of the flowers and leaves because they are elevated.

I have already done a tutorial on affixing the flowers to their stems the easy way. I will do another tutorial on how to fix stems to the leaves as my next project, so keep tuned in to this blog.

As Manuela  ( manuk.ro)  says, the easiest way is to use a glue gun, and she does it oh!! so neatly, but people like me who fear hot glue guns can still use the good old PVA glue and glue them on quite firmly with the use of my tutorials if they wish.

As you can see, the leaves are made using 5 tear drops but I have used 2 different greens for effect.

Would love to have your feedback.


Thứ Bảy, 27 tháng 4, 2013

New Quilling Technique Tutorial - Firmly Attaching 3D Flowers to Stems

This quilling tutorial fills an important gap in the  tutorials available on quilling 3D flowers. It is important to, not only make  the flowers, but also to be able to attach the flowers firmly to its stem and sepals. Many a quillist stops with making the sepals as they are not sure how to attach a firm stem. So here goes...

Please refer my tutorial here to make a stem using only 3mm strips. If you apply a light coat of glue with a brush and allow it to dry it will make very firm stems.

If you wish to have wire stems, take very thin wire and apply glue to a 3mm strip and wrap it around the wire while holding the strip at a 135 degree angle.


STEPS

Cut the stems to the required size.

Take a strip and glue the edge to top of the stem as shown and let it dry.

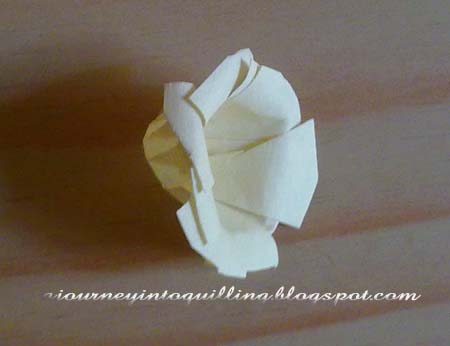
 Roll it into a peg by hand or using the quilling tool. Do not tighten too much nor make it too loose. If done right, you will end up with what looks like the above.


Hold the peg as shown above and roll it forward and backwards applying slight pressure inwards or slightly squashing it and it will push down like a cup. Roll gently and repeatedly till you get the required depth . Do not squash.


 Once done it will look like the above- your stem.


Now put some glue into the cup and around the edges. Also apply glue to the center of the flower and allow the glue to sit a tad till it gets sticky.


Now stick the stem onto the flowers and allow it to dry completely. If you have long stamens sit it on a hollow cylindrical object so your middle does not get damaged.


Once dry you can hold it up like shown above.


ATTACHING SEPALS
Take a 3mm strip or any other size strip you desire and fold it into 5 or 7 equal pieces as shown.


 Keep together and cut to shape as shown above.


Shape the sepals by rolling the end of your quilling tool over the sepals to curl it and  roll on the other side at the bottom to curl in reverse to form an asymmetrical S.


Now glue it as shown from the bottom of the cup and shape each sepal as desired.


That's it folks!! Hope You found this tutorial useful. If you did, would  love to have your comments as it means a lot to know what you think.

Related Posts Plugin for WordPress, Blogger...