Hiển thị các bài đăng có nhãn Quilled petal. Hiển thị tất cả bài đăng

Thứ Bảy, 1 tháng 6, 2013

New Quilling Technique Tutorial - Mold Quilled Petal Lilly

As promised a tutorial on quilling 3D flowers using mold quilled petals. It is not as hard as it looks!!  All the flowers in Filigree Flowers on Trellis and Lilly White were made using this method.

 This method is just an extension of mold quilling which tutorial I have posted  here.

What You Will Need

A plastic or any non stick curved surface such as a spoon, a ball or a cylindrical object placed in a manner that it will not roll away. I use a plastic spoon or the rounded head of my massager!!


Method

Make 20 marquees for each petal using 2 or 2.5" 3mm strips. You will need 100 marquee for each flower with 5 petals.

Now you are going to make the petals on the mold or curved surface as shown above as follows:

R 1   3 marquee                R4  4
R2   4                                R5  3 
R3   5                                R6   1     where R is for row.

Glue each marquee onto the adjacent marquee and do not apply glue to the top or bottom surfaces. Start with 3 for the bottom row and then for the next row, glue the marquee by fitting it into the spaces first like building a wall and then outside making sure you apply glue, only to the portion you are gluing at that time ( i.e the sides of the  bottom half of each marquee) . Continue using the above grid.
Once completed you will get a petal as shown in the pic, molded to the curvature of the surface used as shown below. The steeper the curvature the more time you will have to spend ensuring it is stuck properly.


Make all the petals and allow them to dry well. Meanwhile, cut small circles of 1/2'' diameter. Then make 6 slits to about 2/3 the way to the center. This will give you 5 petals.

Now place the slit circles on rubberized foam or on the underside of your mouse pad ( semi soft surface) and with the rounded end of your quilling tool rub it repeatedly in a clockwise motion till the circle cups in . Then take each petal (you will have 5 if you made 6 slits) and rub the underside of the outer edge of each petal till they curl out like flowers as shown in the pic below. ( the paper curls in towards the surface you are rubbing). Each petal would have opened out if done correctly.
Now if you want your flower to be firm, glue the sides of the petals together up to half way up. Leaving the opened out section unglued gives you the option of shaping the flowers later.

Now glue each molded petal to the paper petals as shown above and allow it to dry. When gluing always allow the glue to become sticky before you bring any two surfaces together.

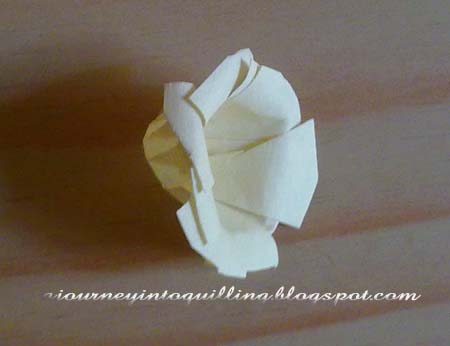
Once dried well you can shape the flower as desired using the paper center. If desired make stamens and glue it onto the paper center.

Thứ Ba, 15 tháng 1, 2013

New Quilling Technique Tutorial - Comb Quilled Two Tone Leaf / Petal


This quilling tutorial is a new technique for making a two color comb quilled or mini-loop leaf . I have not seen these leaves used by anyone else. I have used these leaves for the first time in Floral Cascade and then in my Thai Pongal Card.I developed this technique when playing around with comb quilling and thought I would share it with you all.

This leaf/ petal  can be made freehand or by using a comb. I have given both methods here.  Try to look at the pics and understand the method before reading the instructions.

Comb Method

1


 Take a large comb (use the side with a wider gap between the teeth) and a 3mm strip of your choice and make a loop around the last tooth and glue it shut.

2


 Now thread the strip under the next tooth and bring it back up as shown in the pic above.

3

 Loop it back towards the end of the comb and glue the strip at the very edge with a tiny bit of glue.

4

 Next, fold it forward as shown in the 1st pic above making sure it is aligned on top of the other loops you have made and thread it under the next tooth as shown in the 2nd pic above.

Continue making about 5 to 6 loops (the size and number of loops will depend on the size of the comb. Large combs with more space between the teeth will give you larger leaves).

5

 Remove from comb and leave the balance strip to wrap around the leaf or tear off excess.

6

 Quill another half leaf in another color and get the same number of loops. Then glue them together as shown above then glue another strip you want to use to wrap round the leaf, to the bottom as shown.

7


Now apply a wee bit of glue to the edge of each loop of one color and glue it to the loops of the other color gently and wind the strip around to encircle the leaf.

That it folks!!


Manual Method

The leaves made by hand will look less symmetrical like it does in nature. To make sure that the loops of the two halves  are the same sizes both strips should be shaped together.
 Make a loop holding both strips together. Do not paste the strips together.
 Fold the loop forward at the place the loop starts.
Make the second loop so that it overhangs the 1st loop. Size it by using your third finger to push it over the 1st loop as shown.
 Once again fold it forward and create the 3rd loop and push it over the second loop as shown to size it. Continue in this manner till you reach the size of the leaf/ petal you desire.
 Separate the 2 strips and it should look like the pic above.
 Now apply a tad of glue at the top (not the tip) of each fold as shown in the picture and you have made the 2 halves of your leaf/petal.
This is what your half leaves will look like.
 Now glue both the half leaves at the bottom as shown.
 Apply glue to the top of each loop of one of the halves as shown.
Glue the loops as shown to make the leaf. do not squash it. Gently hold them till they get stuck and then encircle the leaf with another strip of your choosing and your done.

Just a tiny request to those of you who use this leaf , please give a link to this blog so that others may learn too.
Related Posts Plugin for WordPress, Blogger...