Thứ Tư, 27 tháng 3, 2013

New Quilling Technique Tutorial - 3 Color Folded Petals

A new quilling technique for making 3D flowers from paper strips. I call this quilled coz you need 3mm or 2mm strips. The thinner the strip the daintier it will look. This method is easy and can be adopted by begginers too.

The method is flexible and ideal for making petals with several colored layers. You could also insert color strips between the folds to get a different appearance. There are many possibilities so be innovative.

I have used this technique for Pansy Paradise and Sweet Williams.

Method


Make 5, looped petals with 5 loops each using white strips. Look under Leafy Grass in my tutorial here  if you don't know how to make them. You can adopt my size standardisation method here to get  petals of the same size. Make the folds about 3mm long

Now make zig-zag or fan folds with 5 peaks each using 5 pink strips. You could keep the top looped instead of folding if you wish to have looped petals. The loops should be of the same size. Make the height about 1 cm.

Glue the the folded strips over the looped petals as shown above. 
Now take 5 strips and fold as shown above. One long, one short if you require uneven edged flowers. You have to have 9 peaks, 5 short and 4 long. make the long fold about 5mm.
Once again, glue the strip on top of the pink as shown above about 3/4ths the way up like a cap. Make sure the long fold are in between and only the short folds are glued to the pink loops.

Once you make all 5 petals you can arrange them into a flower and glue the petals onto a center or to the adjoining petals. For the Dianthus, I have no center. The stamens are glued to the middle of the flower.
 Suman Pandit left an excellent comment, this turns out better if the paper is heavier as it holds the shape better so do try it out with 100 or 120 gsm paper.

Good Luck!!

Chủ Nhật, 24 tháng 3, 2013

Quilled 3D Flower Frame - Sweet William

A quilled flower frame of Sweet Williams or Dianthus  to celebrate spring. The camera has warped my straight frame!!  This time I have used paper strips folded Zig-Zag (fan) to make the petals. I had to create two tone , jagged edged petals,  so, apart from using small basic shapes to create a molded petal I thought this was the easiest way to make the petal.

The techniques is the same one I used for Pansy Paradise. This petal has white at both ends and pink in the middle.  This is not a petal that will satisfy a perfectionist,  but I am more prone to look at the forest rather than the tree so it is fine with me. I am more interested in the appearance looking natural so I tend to overlook the flaws.

The leaves are also made using the tapering fan fold or christmas tree fold that I mentioned in my Poinsettia Tutorial. Though these are not the real Sweet William leaves I kinda preferred them for this frame, hence I have used them.

The Plant was made 3d and then glued to the backing.

Love to hear from you all.

Thứ Hai, 18 tháng 3, 2013

Quilled Picture Landscape - Easter Chick Among the Roses

A quilled picture landscape of a newly hatched chick to depict Easter is my next offering. Easter is a time for renewal, forgiveness and new beginnings. Its spring too, the season of renewal. Nature's time for procreation.

As you can see, I'm more into quilled scenes than flowers. It somehow gives me more satisfaction and is more thrilling as it is more difficult to make. I  need challenges, so I try to do what seems difficult. I wanted the downy effect for this one so I did it differently.

I saw a vector image from which I got the idea.As you can see I have used a combination of techniques here. I have used a 3d curved cone for the beak. I was awful at 3d quilling but managed to figure out how to do it now. So I made a curved cone so that the chick looks3d.

For the roses too I did a little variation to make it look  a bit like those vintage roses. I don't like it when it looks like a symmetrical coil. So guess what I did??  I crushed the strip before quilling so that the wrinkle gives it a more natural look. Be careful though, as crushing means it won't unwind easily so you got to be able to shape it a bit and maybe you have to glue a bit hear and there. Here is a closer look.
The rose leaves are folded leaves with serrated edges. I fold the leaf in the center first. Then with the forceps I fold it like a fan . I use forceps so that I can fold it thin. After opening the leaves I curl them in the direction I want, curling them only at the center vein. I usually glue the leaves around the stem.

The blue flower is made using 3 punched flowers shaped to cup. If you keep the punched flower on a semi hard surface and apply pressure to the middle with a curved, blunt surface like the end of your quilling tool, it with curve up. Apply pressure in circular motion so it cups. You can control the depth of the cup by the amount of pressure you apply.

I have also scored a line in the center of each petal for an embossed line. Have a closer look.
The leaves are made using asymmetrical loops. If you can't figure it out, leave a request for a tutorial.

I have used 2 highlights to bring out the sparkle in the eye, and have used fringed strips for the chick.I have not made them into flowers but have just folded and glued them and then fluffed it out. I was too impatient to cut it narrower, though I think it will look better that way. Cutting the fringe manually  tried my patients to the very limit but I managed it since I cut little by little while creating the chick and that helped motivate me.

I look forward to your comments.

Thứ Ba, 12 tháng 3, 2013

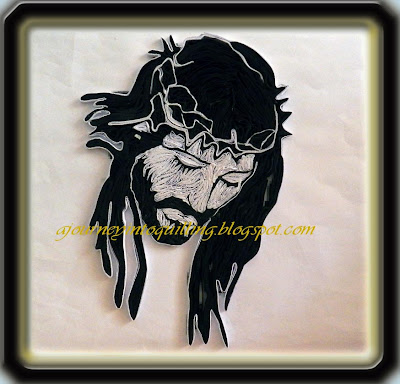
Quilled Picture Portrait Of Jesus Christ - Into Thy Hands.....

This quilled picture portrait of Jesus Christ on the cross reminds me of his last words. " into thy hands I commit my spirit". This complements and completes the series of  3 other  Christ's portraits I have done which relate to the passion .

Crown of Thorn
To Calvary
Father Forgive Them


I have used a combination of coils, zig-zag folded shapes (tutorial here) and graphic quilling for this project. I have outlined the portrait in white to achieve the effect of reflected light. I think it helps to enhance the image and bring it out of the white background.

I have tried to make the nose look a bit hooked by arranging the shapes appropriately.

All you wonderful people are so generous with your comments and it encourages me no end to try more difficult project. I would love to hear what you think of this one.

Thứ Tư, 6 tháng 3, 2013

Quilled Picture Portrait of Jesus Christ - Father, Forgive Them

A quilled portrait of Jesus Christ On the cross, quilled landscape style with basic shapes in black & white is today's post. Easter has no meaning without Good Friday, so this is dedicated to all believers in Christ, in mercy and in forgiveness and redemption. The greatest gift is to be able to forgive those who hurt us.

I quilled this because it reminds me of the moment when Christ said "Father, forgive them, for they know not what they do".

I am glad that the beauty of the face has come out well. I have quilled it like a mat so that it can be glued onto any backing.

I have done a couple of portraits of Jesus Christ, both relating to Good Friday here and here. One was using basic shapes and the other using strips packed densely. I was determined to get the eyes and the expression just right, so I chose a design with the eyes opened to work on.

I'd love to hear your comments.
Related Posts Plugin for WordPress, Blogger...